Friday 26 May 2023

A Very British Civil War, 1939: Battle of Nevilles Cross (One Page Rules)

After a significant hiatus due to Covid and other interests, this week we reignited A Very British Civil War with a large multiplayer game.

We’ve been playing a lot of One Page Rules Grimdark Future lately and we’ve been talking about using those rules for a historical period like World War Two. AVBCW seemed like a good step towards that, so we mocked up some OPR lists and set to it.

Lists here.

So, picking up where we left off, here’s the narrative for the Battle of Neville’s Cross, May 1939.

Battle of Neville’s Cross, 23rd May 1939.

During the long winter of 1938 all sides in the war spent the time rebuilding defences, recruiting new forces, rearming, and resupplying.  Hostilities remained low throughout the winter, aside from a few border skirmishes, punch-ups in local pubs, and the war of words in local newspapers. Manoeuvres throughout February, March, and April eventually brought two factions into the first major battle of 1939, and once again the transport line to the west of Durham played host to the conflict.  The A1 at Neville’s Cross near Durham was troubled with the rumble of barely fuelled engines and the ripple of rifle fire as around 9.30am on the 23rd May reignited the war.

Coming in from the west was a Socialist alliance.

The Chopwell Communists committed a small force of new recruits, supported by cavalry and a T26 tank acquired from Liverpool. They took the right flank position along the A1.


The centre was held by a Socialist Local Defence Volunteer force identified most likely as an anti-Anglican League group from The Sands area of Durham. Made up mostly of elderly ex-servicemen and Great War veterans, they had a couple of vehicles and a lot of bravery on their side.


The left flank position was occupied by a force of Socialist regulars who had deserted from the Catterick Barracks and camped out in the Dales near Wolsingham over winter. These fellows threw their lot in with Chopwell and brought one of the very rare Matilda II tanks with them.  This behemoth of a modern tank is one of a very few that made it off the production lines before the outbreak of war.

Advancing from the east was an anti-Socialist force made up of three longstanding allies.

Facing the Chopwell positions was a skilled and well-trained force of Lord Lambton’s “Hounds”. Over winter they’d made good use of their time developing quality infantry tactics.  They’d also acquired a good supply on Lewis guns and bought in a stable of Austin armoured cars. Lord Lambton was sick of his pride and joy Rolls Royce fleet getting damaged, so he spent some cash on front line replacements.


In the centre was Lord Percy’s Tenantry.  Well supplied with a rag-tag collection of armoured vehicles, Lord Percy had increasingly moved his garrisons down south to ring Durham and support the ongoing hostilities there.


And on the left, facing the Catterick deserters were the Gateshead German League.  Rumours of their terrible behaviour towards the locals in their area have been flatly denied by the GGL leadership, but what is certain is that the winter saw them heavily resupplied by imported German arms and materiel.


Each side fielded three forces, each of 1500pts (so 4500pts a side).

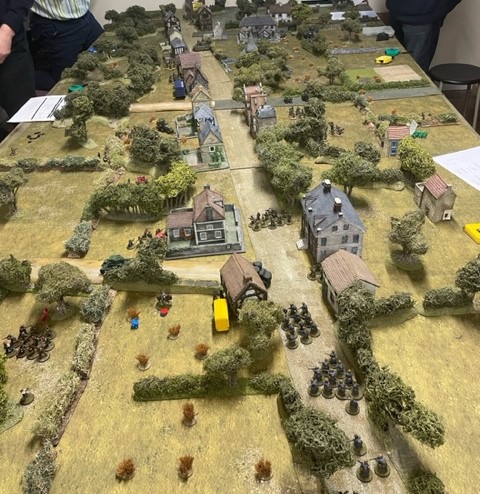
We set up the game using the OPR rules, and decided that on each side’s go, each player would activate a single unit, so each side would see three units activate each "bound".  The objectives were clear – capture and hold the three crossroads along the A1. We had 4 Turns to do this, so aggressive play would be needed!

Boths sides set up simultaneously (to save time), and we set to it with the Socialists taking the first turn.

Turn 1

On the right flank the Chopwell forces found it hard going.  They advanced into a wall of disciplined Lambton rifle fire.  The Lambton units were well commanded with leaders instilling fire discipline and this told on the Communist forces stopping their advance well back from the A1.

Lambton’s Hounds pushed up aggressively, taking a solid position at the road and setting up for a coming surprise…

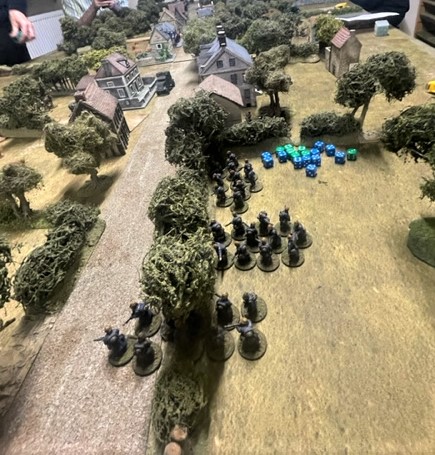
In the centre, the Sands LDV and Lord Percy’s forces advanced through a built-up area near St John’s Church at Neville’s Cross.  There was a significant exchange of fire along the road, and rifle fire crackled around the nearby buildings.

The left flank was similarly pyrotechnic with the Catterick deserters and GGL pouring heavy fire into each other.  Antitank guns spat at armour and skilled riflemen picked each other off at range.  The Catterick boys made better progress towards their objective on the A1 though, forcing the GGL onto the back foot. 

Turn 2

Lambton’s Hounds sprang a trap! Their mercenary elites had snuck across the road in the early morning and hid in a nearby hollow. With the star of hostilities, these fanatics appeared on the flank of the Chopwell position. This startling and unexpected arrival threw the Communists into disarray and their rear support units struggled to counter the withering fire from these killers.  At the same time the Lambton’s Austin armoured car got in on the action, tearing a Red cavalry unit to pieces. Reeling, the Remaining Red cavalry charged the Austin and managed to knock it out!  The Austin crew panicked and surrendered, while the cavalry sabotaged the vehicle to prevent its use. Despite this minor victory, Lord Lambton’s forces took a commanding position on the road and the Communists were fighting a losing battle from that point.


The glorious but doomed Red Cavalry charge takes out the Austin armoured car!

In the centre the fighting between the Sands LDV and Lord Percy’s Tenantry became close ranged and bitter. Both sides advanced on the crossroads and rifle fire was almost point blank.  Terrified residents harangued both sides from their upper windows as rifle bullets fizzed down alleyways.  Of course, both sides respected the sanctity of residential gardens and stayed out of the church grounds, but still…


Lord Percy's armour advances.

The left flank continued to batter away at each other, and the GGL brought up their lancer cavalry to try and reverse the position and drive out the Catterick boys.  A brutal tank duel emerged as the Catterick forces pushed onto the A1.

Turn 3

Not content with their earlier trap, Lambton’s Hounds had sent two mercenary fanatic teams out, and the second one now arrived.  These fellows had worked their way into the Communist’s rear area and driven off their supports.  They now arrived on the battlefield directly into Chopwell’s rear position. Meanwhile Lambton’s Houses came across the A1 in force. The Chopwell position was hopeless, and the few survivors began a fighting retreat as best they could. Even the help of some Sands LDV troops coming across to try and take out the Lambton ambush couldn’t save the flank.


The unstoppable Lambton advance!

In the centre, the Sands LDV pushed up their transport truck, Austin Kegresse armoured car, and infantry to take the crossroads. Lord Percy’s troops matched this move putting their rag-tag armour up there too. Fierce fire created a carpark of wrecked vehicles! The crossroads remained contested.


The pile up at the crossroads...

Over on the left flank, the Catterick boys captured the crossroads, ably supported by the fearsome Matilda II. The Gateshead German League attack was blunted, its cavalry gone, and its Panzers wrecked or running low on fuel.


Turn 4

With the two flanks decided, attention turned to the bitter fighting in the centre.  Both sides had lost much of their strength, and neither could dislodge the other.

As ammunition supplies dwindled, scare fuel reserves ran dry, and the local pubs rand the lunchtime bells, the fighting died down and both sides withdrew for a hard-fought draw.


Desperate and horrific close quarters fighting.


After Action

It was an excellent game, and the One Page Rules lists and rules we’d worked up did the job it needed to. There were a few little idiosyncrasies as there are with all rulesets of course.  The game was a lot of fun with some excellent swings of fate across the whole table. The drawn result felt like the right outcome too. We’ll be revisiting this conflict in the north again. 


Pictures courtesy of Lord Percy's photography unit (thanks John!)


Thursday 18 May 2023

Necron Destroyer Arc

Following on from my Necron army, I've acquired and painted up a Necron Destroyer Arc. This was a second hand purchase which was on the sprue.  I didn't have an instruction booklet which made constructing this beast a bit of a challenge!  I got through it with only one mistake though, so that was good.  Obviously it too far longer to build than normal though.

I went for a standard silver paint scheme, with my added bronze and gold highlights.

Anyway, here's the finished article. I'll look forwards to seeing how it performs on the table using One Page Rules.


The pilot clearly has his hands full controlling this floating war barge.

I still struggle with the glowing effect, but I think this one worked out OK.


Tuesday 9 May 2023

Imperial Knight

Alongside the recent painting up of a couple of Knight Armigers, I recently acquired a pre-painted Knight Errant. I note that it was missing a fair few bits, mostly the adornments and accoutrements to the model, but I'm not too fussed.  I could have bought the missing bits from a 3rd party "bits" company, but the model is complete enough for me to get it to the table quickly so its fine. 

As it happens the paint scheme on this model was very close to what I'd chosen for my Armigers (green and gold), so there wasn't much painting I needed to do to get it up to scratch for the table. I think this paint scheme is an "official" Games Workshop one, for House Cadmus?  I find this is one of the advantages of always trying to stick closely to Games Workshop's box art. It makes finding prepainted second options easier!  

The gold trim needed redoing, and I added the ivory accent panels to give the model some visual variety.  I also completed the fine details like the eyes, Mechanicum symbols etc. and scumbled on some lighter green to make the panels seem less flat. 

I'm not too keen on the red casings for the main weapons, but decided against repainting them mostly on the basis of "they're fine as they are", and so why create work? House Cadmus' heraldry includes red so I figured that'd do, although generally Games Workshop presents the Cadmus livery as green, black, and yellow. I gave them a few washes of caroberg crimson wash to give them some visual relief.   

I also added some transfers for the iconography (I use micro sol and micro set for transfers), sorted out the base and called it a day.

Overall, a good result I think, and together with the Armigers I now have the core of a mech-lance detatchment for any loyalist army.

They're also the solid core of a Titan Lord force for One Page Rules.


I need to drill that barrel out...


The Micro Sol / Micro Set do a sterling job on the transfers.
A bit of paint to mimic scratches enhances the effect greatly.


House Cadmus heraldry on the knee.

Ground up shot! 
The last thing most enemies will ever see...

I painted the cabling grey to give a bit of difference
without distracting from the overall tone of the model.


I guess he's the 17th Knight of the 52nd Cohort?

Still not convinced by the red weapon casings.


Tuesday 2 May 2023

Space Marine, Crimson Fists: Army Showcase - Addendum 2

The grand "get everything painted" project continues at pace, and I'm almost done with all my proper space marine models for my Crimson Fists. I had a couple of old drop pods in their boxes so I broke these out, slapped them together and threw some paint at them.

The drop pod models actually have moving parts, with the "doors" being able to swing open to reveal the interior.  I however, made the decision to simply glue them shut, saving me the time and effort of assembling and painting the interior components.  I generally don't favour moving parts on wargames miniatures, as anything that moves is more easy to break.  Also these drop pods are quite big in their closed configuration and even bigger when opened up, so I went for "permanently closed".

Anyway, they were super quick and easy to build and paint, taking about an hour (not counting drying time) from sprue to finish.


That paint scheme was very simple. A black undercoat, Macragge Blue spray top coat, sprayed with zenithal effect to retain the black in recesses and undersides, and then a simple detail highlight on the black "wings", metal parts and badge details. A black pin wash in the recesesses, and a heavy balck overbrush from below (to suggest burning from entering an atmosphere) and the pods are done.

I think its just the Primaris marines I have left to finish now, and I can call my Crimson Fist marines done (for now I guess...). I'm left the primaris until last as they are just so bland and uninspiring. Ho hum. They'll get a basic paintjob to get through them quickly I think. 


Death Guard Army Showcase Addendum 3

Almost there with finishing everything I have for the Death Guard!

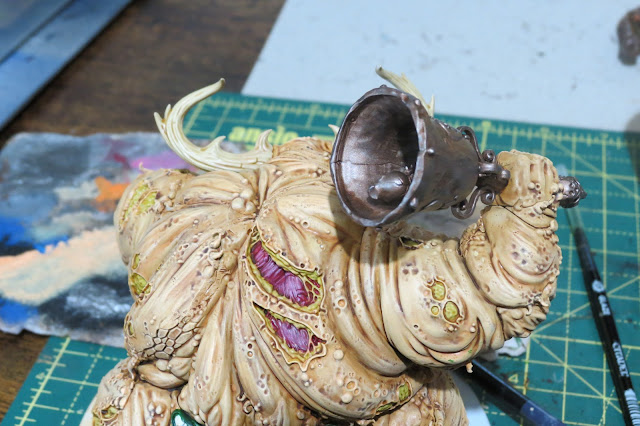
Next up is a Great Unclean One. These manifestations of the plague god Nurgle are marvellous little models. It was surprisingly easy to build, consisting of only a few pieces. That being said is could have been done as fewer pieces even so.  I often find with Games Workshop kits that I think, "well those 4 bits could all have been one bit".  I'm sure they break their kits into pieces for no reason other than to sell plastic glue.

The Great Unclean One kit actually comes with a variety of heads and hand/weapon options and I think that many people magnetise these parts to give the kit some customisability. I considered this, watched a few YouTube videos on how to magnetise models, and the Great Unclean One in particular, and...decided not to.  It looked like a lot of effort, and although I have magnets to do this, I thought it'd be a bit too much bother.  I'm happy that as long as I explain to an opponent what this model represents I'll be fine. 

Anyway, after assembly there were a few gaps where the kit didn't sit right, and noticable joints. So I broke out the Green Stuff modelling putty to fill those in.


Next up, painting the beastie!


Continued...

So the painting is done, and I'm rather pleased with the result. For painting a model like this there are two basic stages after the undercoat - base coat and washes.  

In this case, I used a light ivory undercoat as I was intending to wash the model down from light to dark. The colour palette for the Great Unclean One will match the Nurgle deamons and Nurglings I've already painted.  "Out of the box", or rather in line with the "official" Games Workshop box art or colours, these daemons should be painted green.  While I usually like to paint fantasy models in line with their offical colours, a hangover of long years of painting historical models to acurate uniform colours I guess, in this case I've decided to paint my daemons in fleshy colours.

Base Coats

I put down the flat base coat colours. In this case a thinned wash of Tau Ochre paints served for the primary skin colour. The exposed fat I rendered in Dunklegelb (German tank yellow), which I felt was a good approximation of the colour of live human fat. The iron parts were treated with my "sort of rust looking" effect, and the exposed muscle and organs were base coated in a thinned dark red. the teeth and horns were given an ivory coat using GWs Ushabti Bone paint. Finally I used a dark bronze for the bell and other bits and bobs.

Oh, and to make painting a bit easier, I left the chain net thing off during the process.


From here on in, its just a matter of layering washes onto each other to try to create the look of rotting, diseased, and fly-blown flesh. The wash colours I use include mainly Games Workshop "shades":

  • Carroburg Crimson (dark red)
  • Reikland Fleshshade (sort of red)
  • Druchii Violet (purple)
  • Athonian Camoshade (dark brownish green)
  • Agrax Earthshade (dark brown)
  • Seraphim Sepia (light brown)
  • Nuln Oil (black)

I also used a couple of contrast paints:

  • Plaguebearer Flesh (olive green)
  • Guilliman Flesh (fleshtone)
  • Blood Angels Red (red)
  • Black Templar (black)

And a few others (glazes and technical paints):

  • Blood for the Blood God (red blood effect)
  • Nihilkh Oxide (a verdigris effect - must be used very sparingly)
  • Lamenter's Yellow (yellow glaze)

I use these in layers and wet mixes in a fairly random manner, to try to create an interesting, mottled skin effect that approximates the rotted and festering effect I'm after.  I'm happy with the result, although the washes do tend to create a bit of shine on the model.

On that point, I never varnish my models and haven't done since the late 1980's when I had a small army og West End Games metal Star Wars stormtroopers ruined by a varnish that yellowed.  I've almost never varnished models since (with no ill effect on the wargames table). Matt varnish would take the shine down here, but I just don't trust it.  If anyone has a way of taking the shine off without matt varnish commint below - it'd be a great help to me!

Anyway, here's the final result.