Wednesday 24 February 2016

Warband: Goblins vs. Hill dwarves

This week our usual roleplaying session was interrupted by an unexpectedly absent GM, so I gave some friends a run out with my Warband display armies instead.  They've played before, mid-last year so we were all looking forwards to another bash.

Because the armies are designed as showcases, they are a bit of a mixed bag and the lists are as follows:

Goblins
General (Exceptional)
Shaman (Good)
2x Warriors
2x Archers
2x Wolf riders (Skirmish, 1x Hero)
1x Giants

Hill dwarves
General (good)
Spell-smith (average)
2x Warriors (Resolute, Shieldwall)
2x Archers (Shieldwall)
1x Berserkers
1x Boulder elementals

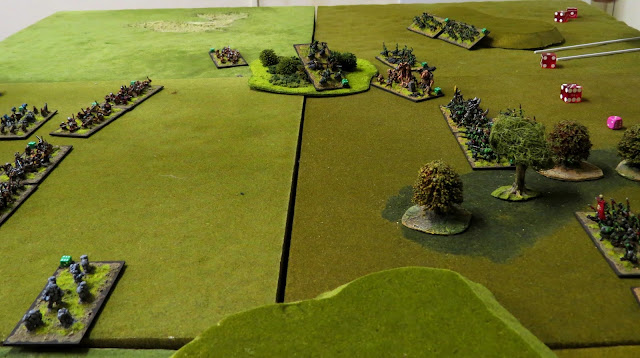
I set up a fixed terrain board, eschewing the terrain placement rules, and the two rival generals set up their forces ready to fight.

This helped save a bit of time, but mainly I just found some nice lightweight boards while I was pootling about at the club.


The goblin king anchored his northern flank with his trusty (or perhaps mistrusted) shaman, put his main strength including the giants in the centre, and his archers on the hill to his southern flank.


The canny dwarf king set up behind his infantry centre with his spell-smith.  To the north he placed his boulder elementals who he intended to send forth to capture the northern hill.  To the south his unruly berserkers bit their axe-hafts and screamed blue murder at the encroaching goblin horde.  No quarter would be given and they were ready to sell their lives dearly.


The dwarves opened proceedings with a cautious advance in the centre.  However, to the south the berserkers were having none of it.  They ignored their king and stomped off as fast as their stumpy legs would carry them.  They smelled goblin blood and lost their collective minds...

As an impartial observer I felt the hill dwarves had a better deployment.  the Goblins were strung out wide, and their magic user seemed a little out of place on the flank.  The opening moves saw the dwarves fail a lot of Motivation tests, including losing control of their berserkers.


The goblins countered by advancing their giants and wolf riders through the southern woodland.


 ...and here is where the first action of the day was met.  Out of control, the dwarf berserkers plunged headlong away from their own lines and soon found themselves completely surrounded by swirling wolf riders and goblin archers.  The little fellows were in their element and the fighting raged here for much of the battle.  

Their natural toughness did the berserkers proud and with their hero point they were able to hold up four goblin units for most of the game.  Unfortunately, the rest of the hill dwarf army didn't really exploit the opportunities this created.


Meanwhile, to the north, the goblin shaman and his coterie found themselves in a rather one-sided battle with the horrifying boulder elementals.  

The goblin mages did their best with some magic attacks as the boulder elementals closed the distance.  The Hill dwarves made a good choice here dumping command points into getting the elementals to charge forwards quickly to prevent taking too much of this spell damage.  Once they got into melee with the shamans, there really was only one result, as the goblin king was too far away to help out.  After they routed though, the hill dwarf king was focussed elsewhere and so couldn't exert his influence to get the elelmentals back into the fight quick enough.


It was a predictably one-sided fight and in short order the goblin spell casters were fleeing for their lives, never to return.


With the northern flank lost, and the southern flank bogged down, the goblin king throws his centre forwards into the glinting iron wall that is the hill dwarf infantry.

This really was a grind.  Resolute shieldwall dwarf warriors are some of the toughest units in the game and the goblins needed all the inspiration their king could muster!  They poured command points into their fighting try try and bust through the dwarf armour, but really this was a massive tarpit that even the giants couldn't help break.  Those units that did fall back or rout on both sides were swept up by both skilled generals rallying the units that broke free of the front line.


And then, after a bitter and extended fight the hill dwarf berserkers are finally cut down, break and run off by the wolf riders.  The goblin southern flank swarms forwards, turning in on the hill dwarf centre.

This was a turning point of sorts.  The goblins could now bring in the extra numbers they had tied up on the south flank.  that said, while the giants and wolf riders made an impact, the archers just couldn't make the moves quickly enough.  Once again the hill dwarves natural toughness proved a hard nut to crack.


The battle here descended into a grind, with both sides having units break and then rallied back into the fight.  Finally the hill dwarf king throws himself into the front line in an attempt to try and break the deadlock.


While the dwarves are utterly tough, they're only average in dealing damage and crucially lack the mobility to run down the enemies they rout.  This means the opponent often has plenty of time to bring broken units back into the fight!  To try and break the deadlock the dwarf king stepped in personally.  As the clock ran down though it was too little too late.


Time ran out and both sides had lost about 160pts of troops.  The goblins took the battle by about 10 points though so it was little more than a bitter draw.  The goblin king claimed victory though!

A good time was had by all and the players certainly seemed to enjoy themselves in what was a hard fought and evenly matched grinding fight.  throughout most of the game it really could have gone either way.

Sunday 14 February 2016

After Dorking 1871: The War in Africa, The Battle of Bundas

  
A couple of years ago, I ran some speculative battles based on The Battle of Dorking 1871 (Reminiscences of a Volunteer) by GeorgeChesney.  


Following the initial battle we also went on to play a couple of other battles.

You can read about these here.


I thought it might be fun to expand things out a little bit into an imaginary colonial conflict between The British Empire and the emerging Prussian Empire.


Firstly, a little background…

In 1871 the Prussians destroyed the British home fleet and launched a successful invasion of the British mainland.  Following their early successes in the south-east, the Prussian advance has bogged down into bitter fighting around London.  The British hastily raised volunteer divisions, and brought regiments down from Scotland and the north.


Emperor Wilhelm and Chancellor Bismark however, realised before they launched the attack that defeating the British on their island would not be enough.  The sun never set on the British Empire and the Prussians knew that they would have to defeat the Imperial territories as well.  


Prussian strength had secretly been built up in Africa over the previous few years, and as their forces marched up the beaches of Brighton, their African forces also marched out.  From the south, the Prussians had developed control over Tanganyika, and in the west Kamerun.  Divisions had been ordered several weeks before to take the long march up to the British territory of the Sudan.  Their ultimate prize was Egypt.

The Prussians advance into southern Sudan (white arrows)

The Prussians had secretly been courting the Mahdi, but had so far failed to get him onside, so the initial clashes in southern Sudan were just between the colonial powers.

The first battle takes place in Southern Sudan along the White Nile at a place called Bundas, 30 miles south of Rabak.  A Prussian army arrives to find that the British have discovered the manoeuvres and has sent a blocking force south from Khartoum.  The first colonial battle of the Anglo-Prussian War in 1871 is set to play out in the desert of Sudan.


We'll use the Black Powder rules to play the game and Pendraken’s excellent 10mm miniatures.


So we come to the battle proper, and the British and Prussian colonial troops are prepared for a proper, sweaty set-to in the deserts of southern Sudan.


British deployment and plans


The British force musters three brigades under the divisional command of General Sir Robert Featherstonehaugh, who is on a forced march south from Khartoum.  He takes personal command of the cavalry, but otherwise has the following troops at his disposal.


Lieutenant-General Edmund Edmondly-Croup ‘Old Ironside’ in command of 1st Brigade.  He had four regiments of regular line infantry, supported by three artillery batteries, a heavy artillery battery, and two sections of Gardner guns.  Having advanced south a few days before, 1st Brigade is garrisoned around the town of Bundas, and deploy in a defensive square, dug in and ready to receive battle.  Leaving his two other brigades to follow on, General Featherstonehaugh rides ahead with the cavalry to assess preparations at Bundas, and deploys his horses as a reserve north of the town.


1st Bgd ensconced at Bundas, while 2nd and 3rd advance in column.

3rd Bgd infantry advance ahead of their supporting cannons.

1st Bgd, with Featherstonehaugh at Bundas.

The redoubtable 10mm Tommy Lobster.  


2nd Brigade, under the command of Lieutenant-General Bernard White advanced at double time along the road parallel to the White Nile.  He had four regiments of regular line infantry, supported by three artillery batteries, a heavy artillery battery, and two sections of Gardner guns. 

Finally, 3rd Brigade came on from the north east, having diverted inland to avoid congestion along the road.  3rd Brigade was commanded by Lieutenant-General Sir William Scarlett, 3rd Baron Abernathy, well-known in the officer’s mess at Khartoum as a ‘guinea general’ who bought his commission, and a bit of a ditherer.  He had four regiments of regular line infantry, supported by three artillery batteries, a heavy artillery battery, and two sections of Gardner guns. 

General Featherstonehaugh was given clear orders to halt the Prussian advance, drive them out of Sudan, and if possible destroy their fighting strength.  Having surveyed the battlefield he gave orders for his troops to hold Bundas, occupy the hill just to the south, and gain control of the roadway leading south down into deep Sudan.

Prussian deployment and plans

The Prussians advanced from the south under the command of General Hans Von Platzhirsch, a solid Prussian officer with an unrivalled confidence in the superiority of the Prussian drill and artillery.   Von Platzhirsch took personal command of a grand battery of Krupp steel artillery, and a small regiment of infantry.  He advanced along the river with the intention of setting up and shelling Bundas from long range.  Even at range his efficient guns should be able to inflict terrible losses on the British.


1st and 2nd Prussian formations heading north into the maelstrom awaiting them at Bundas.

The Prussians approach...


1st Brigade under the command of Generalleutnant Heinrich Dicker-Bauch advanced in close order ahead of Von Platzhirsch’s gand battery, with specific orders to assault and take Bundas.  He had at his command four infantry regiments, a cavalry regiment, and two artillery batteries.

2nd Brigade under Generalleutnant Willhelm Schnurrbart with four infantry regiments, a cavalry regiment, and two artillery batteries was ordered to make a rapid advance to skirt the east of Bundas, and push up to threaten the northern road.

3rd Brigade commanded by Generalleutnant Joseph Wurstesser was under strength with only three infantry regiments and two artillery batteries was ordered to advance and hold the inland flank against any possible British move to counter the 1st and 2nd Brigade advance.  Wurstesser pushed his forces hard and managed to reach the outskirts of Bundas, before establishing a position to wait for the other brigades to catch up.

Von Platzhirsch’s standing orders were for his men to ‘march to the sound of the guns’.  With little opportunity to survey the field before time, and relying on poor maps, he gave the primary command to capture Bundas, and secure the road north to Khartoum.

The early engagements

The Prussians opened proceedings with a divisional advance.  Von Platzhirsch deployed his grand battery, together with 1st Brigade’s guns, far to the south and began a relentless long ranged shelling of the British positions around Bundas.  


1st and 2nd Brigade rapidly advanced onto the hill south of Bundas to form a firing line into the British square.  


Notably, Generalleutnant Schnurrbart’s cavalry missed a memo (blundered) and headed with great haste to the southwest, presumably ‘marching to the sound of the loudest guns’, their own artillery!


Um.  Excuse me, but where the Dickens do you think you're going?!
In response, the British 2nd Brigade, and particularly the 3rd Brigade made slow progress towards Bundas, and the 1st Brigade garrison was left to face the mighty Prussian onslaught without support.  The Gardner guns glowed red as the plucky British gunners thrashed the American contraptions for all they were worth.  After a lot of noise and effort both batteries stood exhausted of ammunition (‘jammed’) with little effect.


The Prussian grand battery of Krupp steel artillery, and the sustained volley fire at close range from their M/41 Dreyseneedle rifles ("leichtes Perkussionsgewehr M/41") battered and swept the British infantry ranks causing horrendous casualties and disrupting two of the 1st Brigade infantry regiments. 

To the east of the White Nile, the exchange of fire was more sporadic, but the British got the better of the exchange, causing casualties across the Prussian line.

After an hour or so, the British seem ready to fall.  The Prussians on the hill could see the rear ranks of British begin to waver and look back to Bundas.  “Now my boys!” Went out the cry from Generalleutnant Dicker-Bauch, as he opened a gap in his infantry and sent forth his cavalry into the British line.  


Despite the redcoats’ closing fire, the Prussian horsemen struck home with a clatter and the British infantry collapsed and were swept aside!  Their blood up, the Prussians could see Bundas ahead of them, but of more interest to them was the British reserve cavalry positioned to the north.  At a sweeping gallop the two mounted regiments clashed and after a brief but vicious sword fight, the British turned tails and fled!


The British garrison square was breached!  The Prussian cavalry swung round to threaten the rear of the British 2nd Brigade, but stopped to rest their horses and reorder their lines.

Shortly after, the British 3rd Brigade finally got its forward regiments into the fight, and concentrating their fire on the Prussians broke the morale of an infantry regiment. 


2nd Brigade turned its artillery on the Prussian horse and in a fierce close ranged bombardment scattered the cavalry, driving many into the Nile.  The survivors surrendered.


However, the game was up for the British garrison, and continued Prussian artillery broke the garrison’s morale.  The remaining redcoats’ morale collapsed and neither Featherstonehaugh, nor ‘Old Ironside’ could stem the tide.  Many fled into Bundas in search of local boats to get them across the river.  The rest surrendered, or ran north up the road to Khartoum.


At this point we hit the end of the evening’s play and an assessment of the situation ensued.  Did we need to continue the fight next week, or is it all over for the British?

The players agreed that while the British had lost a 3rd of their force, and Bundas was open for taking, the Prussians were now badly out of position, and had significant casualties stacked up along their line.  We agreed that the battle was still in the balance sufficient to warrant continuing next week, so...part two to follow!

Once again the Black Powder rules proved to be well worth the effort, producing a fun, epic sweep of a game, with the ability for the players to step back out of the detail and rulebook-fiddling, and play a proper battle.  Its jolly fun too!

Part 2