Friday 26 April 2013

Battle of Barnet (14th April 1471) Dux Bellorum

We finally got round to trying out the Wars of the Roses amendments for Dux Bellorum that I put together.  For us this is a bit of a long running saga as we've had this Wars of the Roses thing bubbling under for a couple of years now.  Lack of rules, other priorities, and a general lack of impetus means that only a couple of us have managed to bring our armies to completion.  Mine is currently languishing in a half painted state.

However, with a spare week and a couple of armies completed, we decided to give things a tryout.  We decided on a historical battle, The Battle of Barnet, put together a couple of forces based on an old DBM scenario we dug up, and kicked off on a bit of an adventure.

Would these rules hold together?  Would the battle play out as expected? 

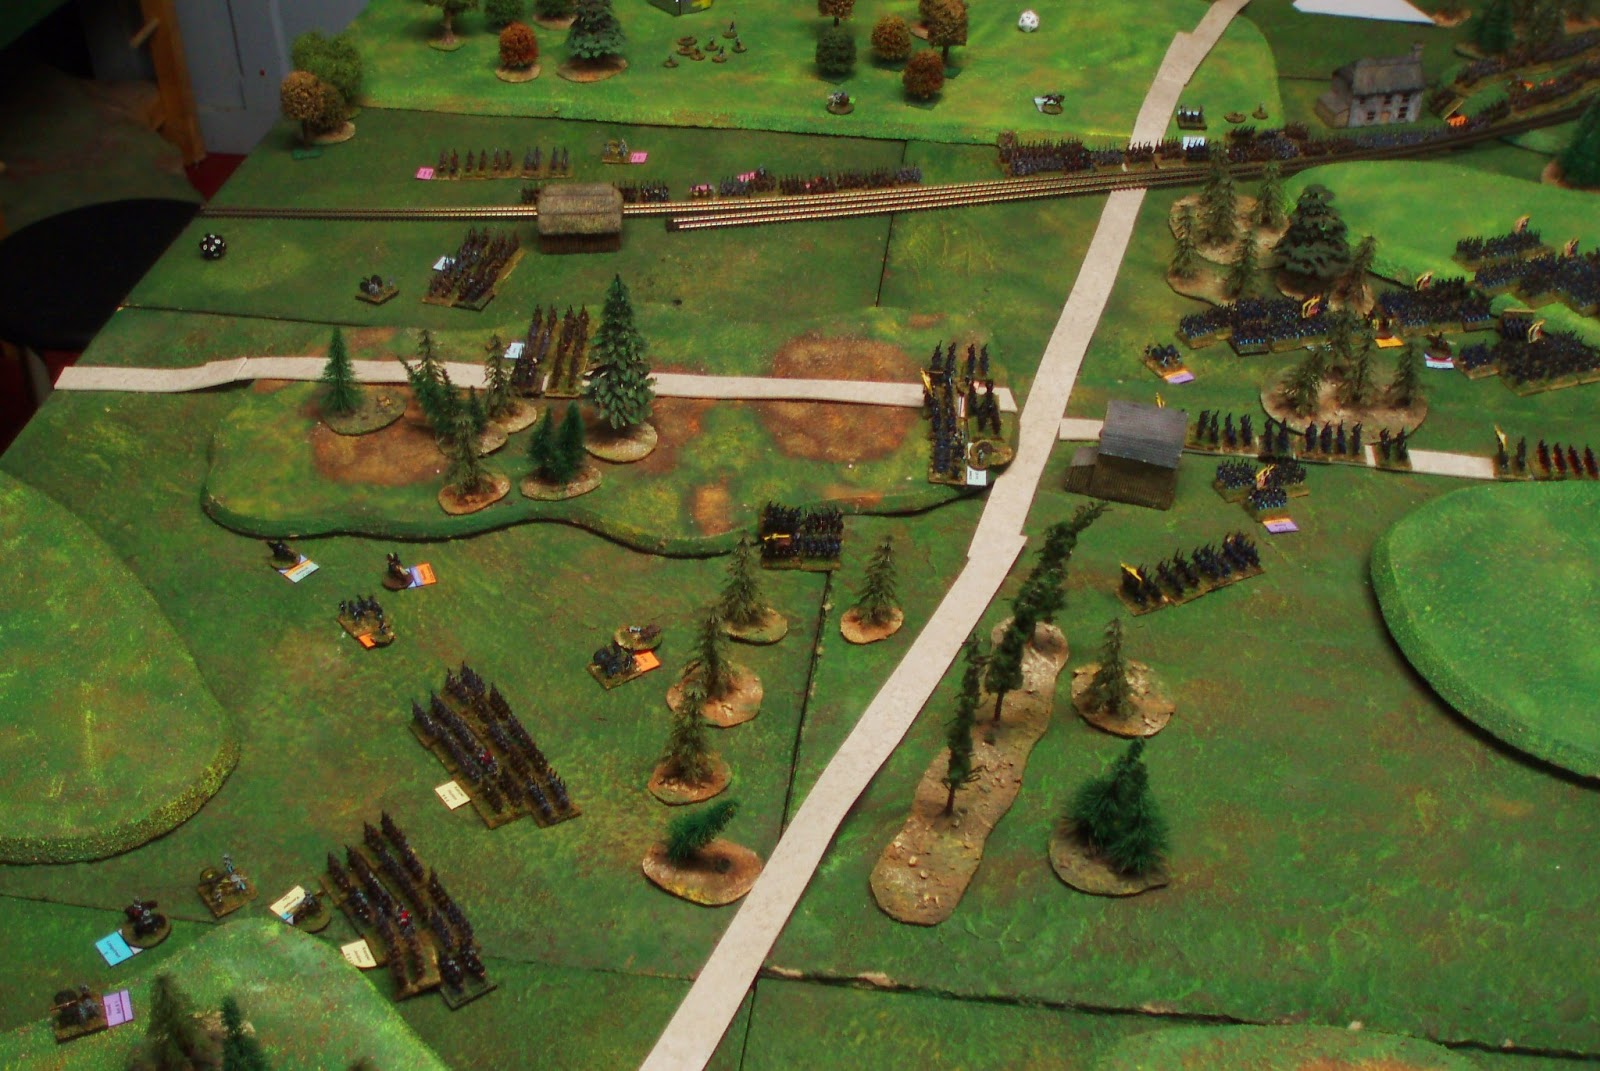
We fought this battle using 28mm figures, which are mostly the Perry plastics, with a few Perry metals thrown in.

The forces were constituted as follows:

Lancaster
Centre Battle
Mounted Companion (Earl of Warwick) 5LP
1 Retinue Billmen
3 Retinue Bowmen
1 Militia Billmen
3 Militia Bowmen

Right Battle

Mounted Companion (Duke of Exeter) 4LP
1 Mounted Men-at-arms
1 Retinue Billmen
1 Retinue Bowmen
2 Militia Billmen
2 Militia Bowmen


Left Battle

Mounted Companion (Earl of Oxford) 4LP
1 Mounted Men-at-arms
1 Retinue Billmen
1 Retinue Bowmen
2 Militia Billmen
2 Militia Bowmen

Yorkists
Centre Battle

Mounted Companion (Edward IV) 5LP
1 Retinue Billmen
2 Retinue Bowmen
1 Militia Billmen
2 Militia Bowmen
1 Mercenary handgunners
1 Mercenary pikemen


Right Battle

Mounted Companion (Lord Hastings) 4LP
1 Retinue Billmen
1 Retinue Bowmen
1 Militia Billmen
3 Militia Bowmen

Left Battle

Mounted Companion (Duke of Gloucester) 4LP
1 Mounted Men-at-arms
1 Retinue Billmen
1 Retinue Bowmen
1 Militia Billmen
2 Militia Bowmen

Edward IV arrays his battles and marches forth through the thick morning mists.  Warwick was out there somewhere; he could hear him.


He was right.  Warwick's battles were arrayed across the field and advancing steadily.


In the thick morning weather both forces had no sight of each other and the battles had arrayed off set.  Each army outflanked the other to it's right.  


The Earl of Oxford advanced cautiously onto Gloucester's outflanked battle, while across the field, the Yorkist Lord Hastings advanced beyond the hedge line to press the position of the Duke of Exeter. 


In the center the two lines of longbowmen from both sides moved into range as the mist cleared and a fierce archery duel ensued.  Inconclusive along most of the line, the Duke of Gloucester's men were heavily outnumbered and took horrendous casualties.  Their line cracked and began to break.


Meanwhile, Gloucester's Men-at-arms rode out alone to meet the advancing Oxford forces.  The melee was a swirling mess that drew in the Earl of Oxford himself.


Oxford enters the fray!

After an hour or so, both sides bowmen had exhausted their arrows.  


Edward IV ordered his billmen forwards to break the lines of Exeter before them.


Soon the heavy infantry on both sides were locked in a vicious melee.


Weakened by the archery duel, and seriously outflanked, the Duke of Gloucester's battle was savaged and eventually broke. Many good men were hacked down as they fled and the Yorkist flank was now open.


In the center Edward threw in his expensive mercenary pikemen who proceeded to chew through the Warwick infantry.


But it was only a matter of time as Oxford rallied his men from their pursuit and headed across to break Edward in the field.


With matters so desperate, Edward entered the fray himself and soon fought his way through to Warwick!  The two great men traded blows amid their loyal companions.


But the battle was done.  Edward's forces in the center broke and ran and Barnet was in the hands of Warwick as the day faded.


All in all an excellent battle and tremendous fun!  The rules and my Wars of the Roses amendments held together very well.  The battle friction proceeded as expected with an archery duel followed by a royal ruck between the heavy infantry.

Unfortunately we reversed history and Warwick survived, but you can't have everything!

Where did we go wrong?  Well, while Oxford broke the Gloucester battle and turned the flank, Lord Hastings wasn't able to do the same against Exeter.

It was however, to misquote a period, a damned close run thing as Exeter was a unit away from collapse.  Curses!!

The only rule tweaks we considered were making the pikes follow up from combat so i think the amendments i put together worked surprisingly well.  Very unlike me!

Overall, an excellent bash.

Sunday 21 April 2013

Fire and Fury - Second Battle of Bull Run (1st day) - Part 2

Following on from the first session the Union have a hard task to turn the battle around.  The confederates hold all the cards and have a significant points lead.  General Pope will need to be bold to break the lines of Johnny Reb.

And so we started with the Union reinforcements arriving from the west.  


With Longstreet still bearing down on their flank, forces had to be diverted to bolster the second Union line and hold off the Confederate  counterattack.  The remaining forces formed up into the Union norther attacking line, ready for the 'big push'.


 Longstreet pushed his men forwards with all haste and with a great Rebel Yell crashed into the Union flank.  After 4 hours of solid fighting, his men gave their all but their exhaustion was starting to tell and little headway was made.


And up on the hill, the Union had formed a dreadful line of cannons and rifled muskets.  Though their ammunition was low, and they's sustained some damage, the cannons still had good stores of grapeshot.  As the Rebs charged in, the air was torn asunder and the entire attack was shredded in a cloud of metal.  Union bayonets finished the job...

Though the fighting continued here, and Longstreet did managed to crack the line, his force was utterly spent and attention turned to the main battle line at the railway embankment.


The Union attacked with everything it had.  The fighting was brutal and desperate, and the Confederate position was defensively perfect.

Bloodied and battered, exhausted and with their 0fficers shot down or captured, much of the Union line retired back to their hilltop position.  The Confederates jeered and cheered and whistled Dixie as their lines held, but things were getting desperate for them too.  All morning they'd been shelled by Union cannon and held off attack after attack.  they too were feeling the pressure.  

And... 
...in the centre the Union had broken through!!

With Longstreet held off, and a large hole in the Confederate line, the Union command's blood was up!  The call went out for reinforcements to flood into the gap and force it open.  the Rebs were there for the taking.

But the call fell on deaf ears.  There were no reinforcements to spare!  The survivors of the previous attack hastily mustered into an attacking line but by the time they'd formed the moment had passed.

The overall position following the main Union attack.  Longstreet has been held off, most of the Confederate line has held, but an isolated breakthrough has been achieved in the center.

And so the Confederate second line was able to flood into the breach, cut off the Union troops who'd charged north of the railroad, and prevent the Union exploiting their gains.


Mid afternoon and large numbers of Union reinforcements finally arrived, marching with all haste to the sound of battle.  But Pope intercepted them and ordered them to form defensive lines on the hill.  He knew that the day's fighting was done and that time was on his side.  

As the guns fell silent, the shattered Confederates and decimated Union troops breathed a collective sigh of relief and called for the water pails. 


 Our evening's game was drawing to a close, and there were still enough turns left in the game scenario for a third week.  However, we tallied up the victory points for both sides, and the position on the field and it was clear that whatever the outcome of a further session, the Confederate victory was certain.  So we decided to call it there, the Union camped and waited for the second day.

Unfortunately, the second day of Bull Run would require far more figures than we have so we'll leave that particular battle to the annuls of history!

A great game.  F&F are always fun to play, and in my opinion one of the best wargames rule sets available.  They're perfect for the period they represent.


Friday 12 April 2013

Fire and Fury - Second Battle of Bull Run (1st day)

Every now and then we break out our 10mm ACW figures for a bit of Fire and Fury action.  This week we began a multi-week game of the first day of the second Battle of Bull Run.  Its a tough scrap for the Union blue-coats, hampered as they are by command inertia, facing well positioned Confederates, and being badly outflanked.

Anyway, my section of the battle covered the Union generals Reynolds and Shenck on the west flank and we kicked off with a plan for me to hold off the Confederate outflanking move as well as getting across the railway line early and try to get at least a brigade or two beyond the railroad.  This would stop the Rebs accruing victory points but also hopefully get them to draw some strength off the front line to give us a route through the wall of grey defending the railway embankment.  Meanwhile, the rest of the Union line would hold off, await reinforcement before making its attack.


Reynolds and Shenck read their orders with trepidation.  It seems they are to bear the brunt of the fighting  for the morning. 

To the north of their position Jackson and Starke watch the Union movements carefully.  They know that time is on their side.  They have the better ground and Longstreet is only minutes away to the west.
The Union under Sigel stand resolute in the center as Hooker sits up on Dogan Ridge stubbornly refusing to move until he receives word from Pope.
Shenck heads north at double time, hoping to get across the tracks before  Longstreet arrives in force.  Unfortunately the Confederate flanking Corp begins to arrive before the Union attack develops.  


In a series of brutal exchanges that rage for two hours, the Confederate forward brigades are repeatedly repulsed!


The first arrives, giving enfilading fire into the advancing  bluecoats.  The Union counter and break the Confederate attackers who flee in disarray.


The Second brigade arrives in line and force back the Union counter assault to open a route into the battle.


Confederate pressure could not be resisted however and Longstreet's force finally breaks Reynolds' command, opening the Union west flank.


Reynolds sacrifice had however bought Shenck time to prosecute the attack into Starke's position across the railroad. The position here was weakest, lacking the extensive embankments further to the east.  

Shenck made some progress, managing to push back the Confederates from their forward positions.


Longstreet saved the day again though and Shenck's tenuous position was encircled and shattered.  the attack failed and hundreds of Union troops surrendered.


While this drama played out to the west, Pope fed reinforcements into the Union center.


Around midday, an attacking forces was assembled and ordered into the heart of the Confederate position.


The Rebel position was unassailable however and the first Union attack was repulsed with little loss.


 As the evening drew to a close we'd reached the early afternoon of the battle.  The Union position looks extremely difficult.  Both their attacks had been stopped.  Their western flank had collapsed and a second line was being hastily formed to meet the advancing flank under Longstreet.  We'll pick the game up next week, but the Union is 28pts to 14pts down, so its going to be a tough fight to pull out a win...