Thursday 25 April 2024

AVBCW (OPR) Battle of Barlow 1st & 2nd June 1939

After a peaceful winter, 1939 was quiet in the northeast, at least until a major clash at the Battle of Neville’s Cross on the 23rd of May.  For most, the winter had reminded them of what peace was like and they simply gave up on the war, returning to their jobs and looking after their families.  But this respite was all too brief, and the guns once again crackled around Durham.

The winter had changed a fair bit for the combatants too.  The BUF were now occupied with keeping a lid on civil unrest in Newcastle City, with lots of troublemaking pockets claiming they are part of ‘St James’ army’, a notional city resistance movement. Their attempts to gain political control of Newcastle Council failed as the coal barons closed ranks to maintain their commercial control of key regional assets. Lord Percy north of the Tyne was increasingly drawn into the conflict with Ashington.  The Northumberland Freedom Fighters were also causing terrible problems with hit and run raids on government presence in their goal of Northumberland secession.  The presence of increasing numbers of Scottish Nationalists in the region also focussed Lord Percy’s attentions to the north. The Anglican League cemented their control of Durham city with strong physical fortifications, social policies, and support for the poor (including subsidised pub prices) making them highly popular.  The Right Reverend Hensley Henson, Bishop of Durham had declared his fierce opposition to the Chopwell Communists, Socialist and Union-backed rebels from the start of the war, and his position only hardened as the conflict progressed.  Despite this, the militia he raised had yet to take to the field, preferring to hold their ground in defence.  At Chopwell, rumours spread that all was not well in the leadership.  The firebrand John Harding had spent a lot of goodwill with promises of easy victory which turned out not to be true and the moderates in the Duma were openly calling for a different approach.  For them, Chopwell had gained much, and they preferred to consolidate their gains and move to a political solution to the war.

This handed the initiative to the Establishment Alliance, led by Lord Lambton, who buoyed by his troops’ performance at the Battle at Nevilles Cross decided to strike into the territory claimed by Chopwell. Supported by the Gateshead 'Germans' (with surprisingly Gateshead accents), on 1st June 1939 they mustered at Blaydon and headed southwest on the 20-minute march along Barlow Road.  Although they’d intended to head out in the morning, some issues with a motor truck breaking down meant the Gateshead lads didn’t arrive at Blaydon until just after 1pm, delaying the start to the afternoon. Lambton’s aims were to test the Chopwell outer defences, which the Loyalists met dug in at the village of Barlow. A mixed garrison of Chopwell militia and allied Socialist regulars were wiling away their time and were surprised by the approach of the Loyalists.

The Battle of Barlow began 1st June 1939 and continued the 2nd.

1st June 1939

Hearing the advance of Lambton and his allies, the Red militia occupied their dug in positions to the north and south of Barlow village.


Game Comment: The Reds set up in a strong forward position in Barlow Lane, defending the important objectives.  They 'dug in' giving them additional cover against shooting, which turned out to be an important defensive measure that meant they weathered the early long ranged shooting pretty well. We decided that the hedges didn't impede infantry movement (but did slow down vehicles) and also that it didn't block line of sight, but each hedge shot through added 'one layer' of cover (e.g. shooting through two hedges gave the defender +2 Defence). This impromptu houserule worked really well, allowing long ranged shooting but making it far less effective! 

His Nibbs overseeing the militia and dug in sniper.

Lambton's Hounds advance through the woods, with the musketeers in a truck supported by an armoured car.

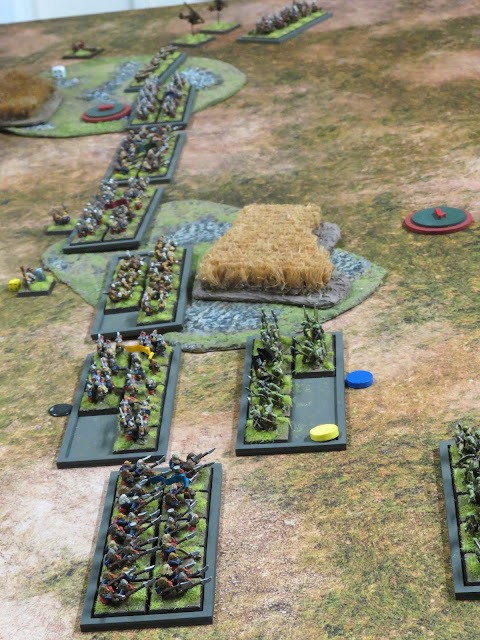
Gateshead regulars well commanded and supported by a medic line up flanked by skittish lancers.


On Barlow Road the Gateshead motorpool, imported from Germany over winter rumble forwards.


The action begins with a swift rush by the attacking armour.

Game Comment: the allied attackers lined up and made a general advance across the whole front.  The suffered initial reverses with the defenders concentrating fire on the advancing armoured car.  Both were promptly destroyed! But it did mean that the following infantry were able to advance largely unmolested.

The sneaky Reds has an anti-tank gun entrenched in Barlow itself and with the opening shot brewed up the German Rolls Royce!

Meanwhile the supporting infantry pushed up,
peppering the dug in Reds with walking fire.


To the north of Barlow, Sustained Chopwell fire shattered Lord Lambton's Austin AC,
drawing the Gateshead PzII across the suppress the Socialist positions.

Game Comment: the attackers concentrated their attack in an aggressive move north of Barlow village, and facing a storm of fire, the Red defences here crumbled quickly.  By turn 3 of 8, it was clear the attackers were going to break through here and they captured the objective on Barlow Lane with minimal infantry losses. Lambton's Hounds were regulars and therefore better quality than the Red militia, and were supported by a large mob of their own militia, putting out a lot of low quality shooting.

To the south, the Gatehead cavalry galloped forwards looking to prick out the Chopwell
defenders at the point of a lance. Ulitmately, they would be blown to spots by the Reds
supporting mortar fire.

As Lambton's Hounds struggled forwards with bounding fire,
the Gatehead regulars set up a devastating firing line that
tore through the dug in militia before them with disciplined volleys.

Game Comment: The southern flank looked more secure for the Reds as the Gateshead German League regulars, ably supported by a medic and a leader with 'take aim' preferred to set up a firing line.  They did push their lancer cavalry forwards, who killed the Reds sniper before being shredded with mortar fire. 


Game Comment: Its about this time after an hour or so of in-game fighting that ammunition was running seriously low for both sides, and the vehicles began to sputter as their fuel tanks drained to fumes. We'd created house rules for this:

Low ammo - In a shooting attack, each '1' removes a successful hit.

Low fuel - after a vehicle moves roll 1d6.  On a '1' the vehicle runs out of fuel and can only take hold actions from then on.


The Reds north of Barlow were shot to bits and Lambton's Hounds advanced to seize their
first objective, Barlow Lane. The mad Gateshead motorcycle charged across open ground
to try to seize the read objective. 
The Red commander leapt out and killed them with a sword as they passed!

In the south, the positions along Barlow Lane south were overrun by Gateshead armour, capturing
their second objective. 

Game Comment: south of Barlow, with the Red militia front line shot to pieces, the Gateshead armour lead the charge supported by its infantry taking the objective here.  The Red reserves moved forwards to try to shore up the forward position but were cut to ribbons in the open, securing the game for the allied attackers!

North Barlow Lane is captured by the jubilant Lambton's Hounds!

The Reds are spent, and the Gateshead lads still have reserves on the way.


Finally, Lambton and the Gateshead crew seized Barlow village from the Chopwell Communist militia and the Reds broken units hastily withdrew to High Spen in panic.

Lambton's orders meant that the allied forces didn't pursue and instead hunkered down to consolidate their positions at Barlow.  The surviving vehicles withdrew for maintenance and refuelling, and much of their force also withdrew to shore up their line of advance.  

As night fell, the scene was set for the second day of the battle, as the Reds planned a fierce counterattack to retake their outer defences.


All told and excellent battle that initially looked tricky for the attackers, with some early losses.  Their greater numbers and higher quality force soon told though and the Chopwell defenders were outshot and overrun.  


_____________________


SCENARIO RULES

Day 1 (1st June) – First Contact

Game length: 8 turns         Table set-up: see plan

Objective Markers

Halfway along Barlow Lane (north)

Halfway along Barlow Lane (south)

18” in from Pawston Road edge and touching north Woods

18” in from Pawston Road edge and 12” south of road

Victory points (scored at the end of turn 8)

Reds score 2VPs each for Objectives 1 and 2, and 1VP each for Objectives 3 and 4.

Loyalists score 2VPs each for Objectives 3 and 4, and 1VP each for Objectives 1 and 2.

Loyalist Forces

Each Loyalist player has 1500pts to construct their force.

The force may include infantry, civilian vehicles, and armoured vehicles.

Red Forces

Each Red player has 1000pts to construct their force.

The force may include infantry and civilian vehicles, but not armoured vehicles.

Prepared positions: Any Red infantry may begin the game “dug in”. They count as in cover until they move.

Prepared ground: At the start of turn turn (during ambush), the Reds may reveal a ‘minefield’. Place a token and roll 1d6+6”. For Turn 2, all Loyalist forces that move within that distance of the marker must make a dangerous terrain test.

Deployment

Reds: Deploy first.  Their baseline is the Pawston Road table edge. They may deploy anywhere up to Barlow Lane. They may ambush but cannot scout.

Loyalists: Deploy second. Their baseline if the Barlow Road table edge.  They may deploy anywhere up to 12” in from the Barlow Road table edge. They may scout but cannot ambush.


Wednesday 15 November 2023

Battle Report [OPR AoFS] The Second Battle for the Ruins of Typtich

"The grand city of Tryptich was destroyed in a cataclysm.  Rumours abound that lost treasures lie amid its shattered dwellings, manors, stores, and temples.

Small bands of adventurers from all the races of the world now scour the ruins, battling for control of lost artefacts, and to plunder the golden hoards they find there."

One Page Rules Age of Fantasy Skirmish rules continue to be our game of choice at the table, and after last week’s bash we gathered again for another go.

Our resident 3D print guru had printed a bit more terrain so the ruins of Typtich grew a little this week!

Once again, we were down to three players, so we set up the table as normal and had a brief chat about a scenario.  Both we’d used last week hadn’t quite been satisfactory for a three-player game so we cobbled together the idea of one objective marker each (on our home ground) and a central objective.  A simple scrap would ensue with the winner being the player who controlled most objectives at the end of turn four.  As it happens this worked really well and made for the most enjoyable skirmish bash we’ve fought so far.

This week I decided to bring a mixed force of Orcs with Ogre allies, to face off against the Ratmen and Chivalrous Kingdoms.

Orcs with Ogre allies – 400pts competitive validation

  • 1x Brute orc boss [1] (dual heavy hand weapons, warcry) – 125pts
  • 1x Black orc boss [1] (heavy great weapon) – 60pts
  • 3x Black orcs [1] (dual hand weapons) – 20pts each
  • 1x Ogre warrior [1] (dual heavy hand weapons) – 45pts
  • 2x Ogre shooters [1] – 55pts each

Like last week this is a bit of an elite force with a small number of tough and hard-hitting units. It’s a type of force I’m playing about with a lot, and I quite like it in the skirmish format.

Ratmen – 400pts competitive validation

  • 1x Battle master [1] (dual heavy hand weapons, army standard bearer) – 85pts
  • 1x Champion [1] (spear, caster[3]) – 90pts
  • 1x Night scout [1] -15pts
  • 2x Warriors [3] (spears) – 25pts each
  • 1x Grenadiers [3] – 30pts
  • 2x Rat ogres [1] – 40pts each
  • 1x Storm veterans [3] (heavy great weapons) – 50pts

After deployment the night scout snuck forwards towards the centre.

Chivalrous Kingdoms – 400pts competitive validation

  • 1 x High Champion [1]
  • 1 x Realm defender [1]
  • 1 x Quest knight [1] (sergeant)
  • 1 x Men at arms [3]
  • 2 x Longbowmen [3]
  • 4 x Mounted bowmen with Lance [3]
10 units, 24 figures.

We deployed in our respective starting zones with, as it turned out, very similar strategies!  Each of us looked to defend the “home” objective and contest the other two, and this led to a very tense and action-packed battle that was surprisingly balanced.

Readhy for battle...

My orc bosses “warcry” ability made my whole force “fast” so I was able to cover ground as quickly as cavalry.  I set up so that the ogres would defend my home objective and the orcs would rush forwards to try to seize at least one other.

The ogres are set to defend while the orcs are champing at the bit to charge.

Loaded with scrapnel they're ready to rain death.

The Chivalrous Kingdoms set up with a similar two-front approach.

A large force of bow & lance knights gallop out from the ranks of bowmen.

The ratmen formed a more cautious mob, deployed to have options on their lines of advance.

Killkill! Yesyes!!

Turn 1

The orcs and ratmen made a rush for the centre objective, only to find the ruined temple impeded by fallen rubble.  A quick dash to the centre would be stymied by difficult ground to cross.

The Chivalrous riders took a more circuitous route, sending much of its cavalry down a back alley towards the orc-held area. Chivalrous archers killed the rat-scout with longbow fire, and the orges opened with some long-ranged cannon fire, picking off a few horsemen with a hail of “scrapnel”.

An angry orc pushes in to oppose the she-rat scout.

The first of the ratmen push forwards, spears at the ready to meet charges.


The orcs push out in force.

A wall of ratmen creep forwards, trying to see how things are developing.

Chivalrous soldiers canter in past the abandoned privvy.

While on the flank, orge cannon fire thing their ranks...

With the armies we’re using turn 1 was a traditional “approach and position” phase. The battle lines could be seen though, and for my part, my intended rush to the centre needed reassessment as the two enemy forces approached.

Score

  • Orcs – 1 objective
  • Chivalrous kingdoms – 1 objective
  • Ratmen – 1 objective

Turn 2

This turn became a brutal “battle for the flanks”. On my left, the two ogre cannoneers tore the chivalrous cavalry to pieces with more volleys of lethal scrap, halting the flanking ride in its tracks.

And after another volley, there are few knights left.

Meanwhile an amazing fight broke out when the insane black orc boss charged into the heart of the ratman advance. Surrounded and outnumbered, he faced attack after attack by ratmen with spears, the ratman battlemaster, a rat ogre, poisoned bombs lobbed in from afar, and the vicious lightning magic of the ratty sorcerer!  Despite it all, the orc’s armour and dense flesh shrugged off all harm as he wailed and whirled his murderous heavy weapon amid the ratkin ranks! It was a sight to behold, and he was loving the scrap! He dished out wounds in return and all but butchered the ratman battle master.

The most intense battle of the game begins with a near immortal black orc!

Diedie! Killkill!  Noooo!!!

Ratogrekillkill!

Nah, yer can't kill me!  *Whack* Ave some 'o that ratboy!

Alright, I'll back off then. I need some goblins to lick me wounds clean.

Back over on the chivalrous front, the kingdom’s finest heroes rode into the orcs, requiring the orc brute boss and the ogre warrior to step in and blunt the charge.

Charge my noble knights!! Yeah Chaaarge boys! 

Ugh, these orcs can't do it. Let me 'ave a go.


Score

  • Orcs – 1 objective
  • Chivalrous kingdoms – 1 objective
  • Ratmen – 1 objective

Turn 3

The established fronts continued their skirmishing, but elsewhere the battle developed.  In the ruined temple, each force sent a unit in to contest the centre objective.  A lone black orc faced a solid group of chivalrous swordsmen, and a nasty mob of moon-glaive wielding ratty elites, as they all stumbled through the rubble.  I was not confident that my orc would survive!

Over on the chivalrous/ratman front, they engaged forces there, both intent on rushing the other’s objectives.  Battle raged on this newly engaged area, with the rat ogre supported by rats with spears, facing chivalrous riders and longbowmen.


Unusually by the end of turn 3 the battle was still very much in the balance.  The ranks all round were badly thinned, although the ratmen were in far better shape having taken fewer casualties. They were also better positioned. It looked like the battle would be decided on turn 4 and it was possible for each of us to win, depending how the turn went.


The battle for the centre begins in earnest.

Score

  • Orcs – 1 objective
  • Chivalrous kingdoms – 1 objective
  • Ratmen – 1 objective

Turn 4

The last turn began, and a surviving chivalrous knight galloped over to contest the ratman objective! His gallant dash was in vain though and the rat sorcerer killed him with lightning magic, securing the ratman home objective.

The knight rushed to contest the ratman objective, only to die in a blast of lightning.


As a countermove, the rat ogre stormed up to take the chivalrous kingdoms objective, this time with more success.  The objective would be contested.

The rat ogre counters with a more sucessful charge.

Meanwhile in the centre, my orc was killed by the chivalrous soldiers, and then the ratmen drove off these soldiers to take the centre objective.  This was not certain however, as the orcs opened a path for an ogre to advance close enough to contest this centre.

The fighting meant that at the end of turn 4, both the chivalrous kingdoms and orcs had broken and had to take morale tests.  In a final betrayal by the dice gods, chivalrous warriors and the orc’s ogre allies fled the field, leaving three objectives in the hands of the ratmen!

The game went down to the final phases of the last turn before the ratmen secured a dominant win.  It was a marvellous, tense and fun game.

Score

  • Orcs – 1 objective
  • Chivalrous kingdoms – 0 objectives
  • Ratmen – 3 objectives

Another marvellous game of OPR AoFS.  If you’ve not played it, give it a go!

Comment from the ratman player

“I thought the scenario was an excellent idea - basically, each controlling one objective at the start, with one in the middle and all starting an equal distance from the objective.

My plan formulated itself over the first turn or so and was to contest as many objectives as possible, and try to force morale fails.

I could see which way it was (hopefully) heading, and you will notice that I tried to avoid too much combat, only attacking when my rear line was threatened. The units on my flank were prepared to soak up the chivalrous bow fire, with the Rat Ogre hovering to charge in in the last turn.

Annoyed that I forgot to charge with my Wizard when I had tee'd it up. I got distracted, but hey ho, it all worked out in the end!”


Wednesday 8 November 2023

Battle Report [OPR AoFS] Battle for the Ruins of Typtich

It’s been a very long time since I did a battle report, mostly because I enjoy my games to the point of forgetting to photograph them!  I made a special effort last night as we gathered for another bash at a One Page Rules: Age of Fantasy Skirmish.

Usually there’s four to six of us at a session, but for various reasons we were down to three players.  We discussed a one-on-one round robin (one of the advantages of OPR skirmish being that you can get several games in of an evening), but instead decided to go with a three-player free for all.

We set up and played the ‘Bear Hunt’ scenario. The bear was revealed on turn 1, and by the end of turn 2 the game was over with a win to the goblins, so moving quickly on, we set up for a more enjoyable free clash over 5 evenly spaced objectives. This game would be simple. At the end of 4 rounds, the player in control of the most objectives would win. Once captured, an objective remained captured until it was taken by another player. 

Note, in the skirmish versions of OPR we ignore the requirement for a 1” separation between friendly units.

The Forces

Eternal Wardens – 400pts Competitive Validation

Crikey lads, there's loads of 'em out there!

I decided to try out a small but tough force and went with my Eternal Wardens.  Only six figures is less activations that the seven we consider minimum (with somewhere around ten being optimal) so I was worried I’d struggle with objective-based scenarios. But I deployed the following.

  • 1x Guardian Elite [1] (dual hand weapons) – 55pts
  • 4x Paladins [1] – 60pts each
  • 1x Destroyer [1] (Meteor Great Hammer) – 105pts

Goblins – 400pts Competitive Validation

Wicked cackling could be hear resonating through the ruined streets...

  • 1x Goblin leader [1] (great weapon) – 30pts
  • 1x Goblin leader [1] (dual hand weapons, caster[2], pet cave beast) – 80pts
  • 2x Warriors [3] (spears) – 20pts each
  • 1x Beast riders [3] (spider riders) – 35pts
  • 1x Nasty assassin [1] 25pts
  • 2x Shooters [3] – 30pts each
  • 1x Troll [1] (heavy great weapon, cave breed) – 65pts
  • 1x Fanatic [1] – 65pts

Ratmen – 400pts Competitive Validation

So could the skittering of sewer-caked feet.

  • 1x Battle master [1] (dual heavy hand weapons, army standard bearer) – 85pts
  • 1x Champion [1] (spear, caster[3]) – 90pts
  • 1x Night scout [1] -15pts
  • 2x Warriors [3] (spears) – 25pts each
  • 1x Grenadiers [3] – 30pts
  • 2x Rat ogres [1] – 40pts each
  • 1x Storm veterans [3] (heavy great weapons) – 50pts

We set up the urban ruin table, and an “X” of objectives and got to deploying. We each deployed to try to seize as much ground as possible, deciding to deploy within 12” of the centre of a table edge. The ratmen also had a sneaky scout who rushed forwards to immediately try to seize objective 3.  

Look at that sneaky she-rat tryng to win the game from turn 1!

At the end my Eternal Wardens felt distinctly ganged up on! This is going to be a hard fight it seems.

The eternals are definitely the filling an a "nasty mob" sandwich here.


Turn 1

The goblins seized objective 4 and advanced to contest objectives 3 and 5.

The ratmen chose to leave objective 1 for later in the battle and focus their forces on contested 2 and 3.

The eternal wardens spread out to contest 2 and 5 and move to contest the centre objective (3).

As set up by the deployment dispositions, my eternal wardens were in the thick of the fighting, with both flanks swamped by enemies.  

On my right, swarms of ratmen and their leader similarly tried to overrun my position. The eternal paladins really held their own though and proved to be very tough fighters.

There's rats coming through the walls over here chaps!


On my left, the paladins fought a desperate action against a swarm of giant spiders, goblin warriors and a lumbering troll.

Err...there's one over here too...but I'm more worried about them goblins.

All three forces sent warriors into the centre.  As the ratmen pushed in a rat-ogre I decided to send my slow-moving destroyer in to take it down and contest or hold the centre objective.

As is usual for the first turn in OPR it’s mostly a positional turn where each side tries to get into a solid position to launch its main attack on turn two.  This game followed that pattern pretty closely but there was some fighting on both of the eternal wardens’ flanks, with wounds exchanged by all sides. 

The eternal wardens ‘battle wedge’ advanced in formation, and the goblins and ratmen both swarmed forth to meet it.

The fight begins at objective 5

One notable combat was between the ratmen’s leader and one of the eternal paladins. Both had the capability to destroy the other in one round of fighting but neither did!

"When he bends down, you smack his brain out with your sword"


Turn 2

The real fighting began in earnest, with exchanges all along the front lines.

Around objective two, the ratmen swarmed the paladins there, wounding him but losing a few warriors in return.  The other paladin here continued to trade blows with the ratman leader in a vicious hand to hand fight.

At objective 3 in the centre, some goblin warriors skulked about, while a paladin was torn to pieces by the rat ogre. In response the eternal wardens’ destroyer lumbered forwards and in a single mighty attack with his meteor hammer obliterated the rat ogre, much to the alarm of the onlooking ratman spell-caster!

SKWEEEE!!!! Gold boy be dead soon! Yesyes!!

Maybe so, but he will be avenged

Shocked ratmen wavering in the face of the destroyer.
The rat-sorcerer looks on in horror and throws some ineffective rat magic at him.

At objective 5 a desperate fight continued with the paladin this time contesting with the goblin swarm, their troll and spider riders.  It was only a matter of time for the paladin to fall, but that time was not quite yet, despite a series of relentless attacks.

I'm not sure I'll survive this...

There were a few limited exchanges (mostly goblin archery) between the goblins and ratmen.

At the end of turn 2 the goblins remained in the lead, controlling objective 4.  All other objectives remained contested. The ratmen had suffered the worst losses of the fighting but most of the eternal wardens were badly wounded. Goblin losses were much lighter.


Turn 3

As ever in OPR, this was the decisive turn of the game.

The skirmishing continued around objective 2, with the ratman warriors chopped up, and the ratman leader on the losing end of another bitter melee.

The combined melee attacks by the troll and spider riders, and a vicious volley of close ranged bow fire from the goblin archers, the paladins were finally cut down, giving the goblins control of objective 5.

In the centre, objective three remained contested by all three forces.

Losses mounted and by the end of the turn both the eternal wardens and the ratmen were testing morale.  Significant numbers of ratmen, seeing how things were going, decided to slink off into the ruined sewers.  The noble wardens stood their ground and at the end of turn 3 the victory conditions were pretty much set.

The goblins held objectives 4 and 5.

The eternal wardens held objective 2.

Objective 3 remained contested.

Objective 1 remained uncontrolled.

Turn 4

With the game pretty much over, we played out turn 4 with what was left.

The main two flashpoints were objective 3, where the eternal warden destroyed tried and failed to clear out the petty warrior scum around him. Over at objective 1, the ratmen rushed over to seize it, only to find the goblin nasty assassin, until this point lurking in ambush, arrived to deny the ratmen their prize!

We played out the remaining fights, and at the end of the turn the goblins took their hard-fought victory!


After action comments

OPR continues to delight with some excellent and enjoyable gameplay. After a year or so of playing the larger game, we’re having fun with the skirmish version for a while that plays differently due to the possible survivability of the units/models. It changes your considerations and frictions, and means you often concentrate of finishing off stunned models to ensure they don’t recover.

For this battle, as the eternal warden’s player I definitely felt ganged up on! The eternal wardens played far better than I thought they would, and despite only six activations, I was able to contest where I needed to.  Its interesting that a unit of three 1-hit models seems like a unit of one 3-hit model, but the difference is the 3-hit model retains all its attacks whereas the 1-hit model unit is reduced by losses. I really missed not having a caster though.  I’m not sure if they are decisive because they are so random, but it felt wrong not to have at least one knocking about throwing magic!

I’d planned to try to seize three objectives.  I think that overstretched my resources. In hindsight I should have put 3 units onto capturing objective 2 and 3 units onto objective 5, secured those and then if needed, gone for the centre.  None-the-less it was a great game and a lot of fun.

We’ve seen the goblins on the table for a few games now and they are a good, solid force with a lot of flexibility. Played well they are a force to reckon with.

The ratmen, like the eternal wardens, were making their first appearance at our table. Like the goblins they seemed like a good force with lots of options.  The poisoned bomb throwers were nasty, and two rat ogres were scary to face!

A note on the models

Obviously, the eternal wardens make use of Games Workshop fantasy models, but our group now has a few 3D printer owners in it and 3D prints are making their way into our games in force. Its hard not to see this technology as at least part of the future of wargaming as it becomes easier and more available to use. It does need a bit of set up and the kit won’t be usable by everyone but still.

Anyway, our game here made use of a variety of 3D printed models and terrain (as well as terrain from our club stock to bulk the table out.

Sandfang Ratkin: Artisans Guild - https://www.myminifactory.com/object/3d-print-sandfang-ratkins-complete-set-51-308008

Faldorn Goblins: Artisans Guild - https://www.myminifactory.com/object/3d-print-faldorn-goblins-complete-set-46-272514

PLA Terrain Sets: Philip Sinn Miniatures -

https://www.myminifactory.com/object/3d-print-scatter-ruins-i-295675

https://www.myminifactory.com/object/3d-print-scatter-ruins-2-323506

https://www.myminifactory.com/object/3d-print-scatter-ruins-3-324277

https://www.myminifactory.com/object/3d-print-scatter-ruins-4-325300

Resin Terrain Set: Cast N Play - https://www.myminifactory.com/object/3d-print-town-ruins-set-pre-supported-318365