So without further ado, here we go.
I'd bought a couple of new cars while out shopping last night, so I chose one of these for this "how to".

And of the teo, this "performance car" was calling to me the loudest!

In my view the key to converting these little cars is threefold:
1. Try to keep the modifications in scale with the donor vehicle;
2. Try to maintain the "profile" of the vehicle's shape as much as possible; and
3. Less is more (don't overdo it).
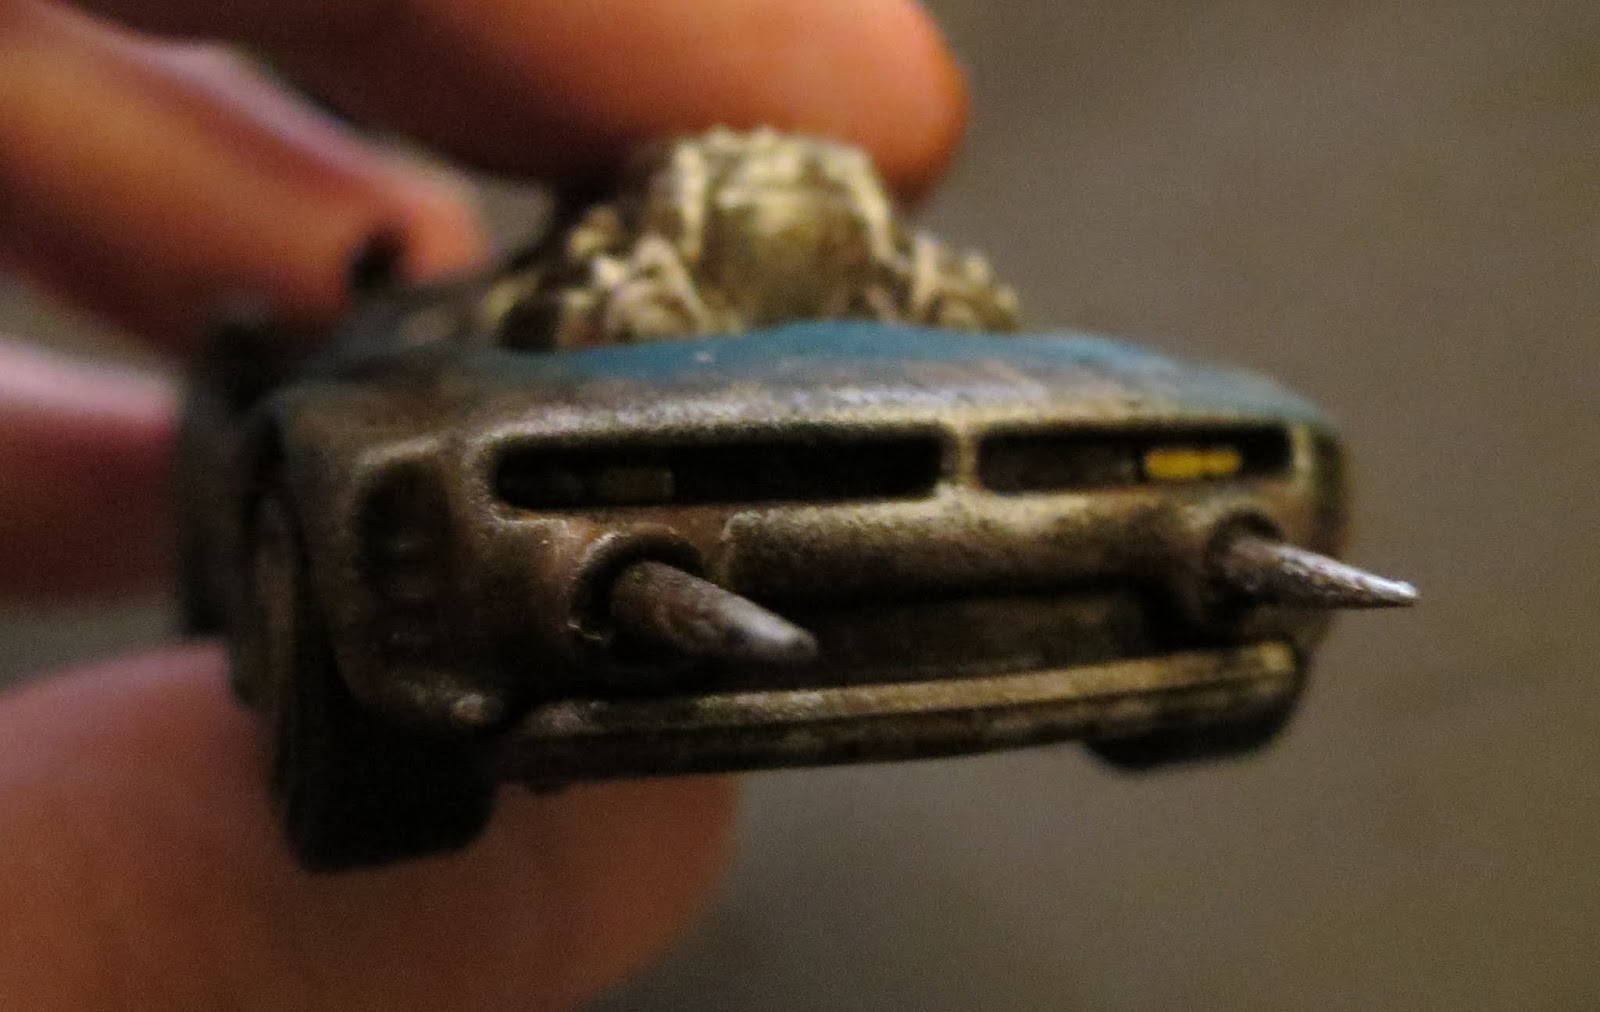
With this in mind I wanted to keep this vehicle as a sleek looking fast-mover. I raided my bits box and found a couple suitable pieces, mostly from Games Workshop's space marine range. I figured plasma pistols would need to be drastically cut down, but they'd serve well as high-tech weapons like combat lasers, or otherwise as cool looking sci fi machineguns.

A couple of minutes later, after some snipping, filing and superglue, I'd attached these pieces to the car. In line with my idea of not disrupting the profile, and keeping the car "balanced", it seemed to me that most of these additions would be best applied to the rear part of the car, as the massive engine block provided anough "weught" at the front. I used the toothpick "spikes" projecting from the front to accuntuate the sleek length of the vehicle.


I put the small lamp thing over the model's petrol cap. I've no idea what it will represent, but it might be something to do with the laser weapons? I used a rifle scope as an electronic viewfinder / camera for the driver is I intend to paint over the glass and make it a fully enclosed armoured canopy.


To give the option of rear dropper weapons, I used the grenades simply glued to the rear.
Once this was done, i sprayed the whole thing brown. I use Halfords brand camouflage paint for most of my undercoat work, and generally prefer brown as I find it less harsh than black or white. In this case its also very useful as it provides a solid base for the rust effect I'm going to apply.

I use two colours to create my rust effect. As I use Games Workshop paints, these colours are Mournefang Brown and Deathclaw Brown. If you use other colourse, a red-brown and an orange-brown will do.

My technique is fairly simple, easy and quick to do. I use a cheap toothbrush, get a bit of paint on it, and run my thumb across to "speckle" the paint on first. I then "splotch" or stipple on larger patches of paint. I use the red brown first, and then the orange brown.

This will achieve the following effect.

Next stage is to take a dark silver or "gunmetal" paint, and give a heavy drybrush over the rusty parts. This mutes and blends the speckled paint together, and brings it to a point where it looks like old metal.


For a post apocalyptic vehicle, I could probably stop there, add a bit of detailing and call this done! But I wanted to give this car a nice bit of colour, so onto the next stage. I'm not a fan of blue, but this one seemed to need to be blue so i chose a colour that my wife assures me is "teal". Games Workshop calls it Sotek Green. I considered that the paint would be shredded off by the extreme speed this vehicle would obviously be capable of. So I applied the colour using a a bit of very heavy drybrushing, mixed with a bit of overbrushing. I began at the back of the model, and tried to only really paint on the rear surfaces, leaving the leading edge surfaces and recesses more rusty.


That done, I move onto the ink washing. On this one I used mainly a brown and in this case Games Workshop's Agrax Earthshade. I applied this colour over the engine (mainly the deeper areas and recesses), along the bottom sills, and in the deeper recesses of the bodywork, to give some definition. I also "heat-stained" the muzzles of the combat lasers.


Ink washing is also useful for "splotching on" to areas where there might be oil spills or similar stains.


And finally, the detailing. I applied some decals (always a pain to do, and I find I need to use PVA in the water mix to get the damned things to stick down) and muddied them over with ink wash. I painted in the headlights, and the camera lense. Finally I gave it a go with a silver paint to chip the edges and run a few serious scratches across the surfaces and called it "job done".
Simple, easy, and start to finish about 90 minutes (not including the drying time for the undercoat).


So, here we have Winston "Wolf" Harland, a speed freak originally from London, but drafted by contract up into the Norcumbrian Arena bush-league. He's quickly become a Blaydon Arean fan-favourite with his high-octane brand of "speed at all costs", and his spectacular multi-chromatic combat laser rig.
Wolf rides a Masseratt Lam del Vento 20, with the F247 duplex V16 engine developing 1238hp. Wolf has wrapped the cockpit in Cerakev armourflex, and runs a Sanya A2 sensor suite. His main weapon is the fearsome Arasaka 90W combat laser array, with multichromatic filters to provide a technicolour display of death. Depending on the Arena game, he maintains a rear dropper rig as well, to cause trouble for anyone trying to line him up as he disappears into the distance.

"Wagwan cuz, check out me whip innit. Trus' me fam, yu don wanna get murky on the track w'me..." - Winston "Wolf" Harland
Very nicely done!
ReplyDelete