Wednesday, 26 September 2012

In the grim Darkness of the Far Future there is only Mad Max meets Judge Dredd, or...Adventures in the Underhive

After many years apart, I've been drawn back into the Games Workshop fold, sort of at least.  Actually since Warhammer Historical (now laid to rest) produced such gems as Legends of the Old West, I suppose its not been that long...ahem...I'm rambling.

No, so, I've been drawn into a little side project planned to hit our table in 2013; Necromunda.  This gem of a sci-fi skirmish game really is something that Games Workshop did well all those years ago.  We're going retro too, eschewing the latest sleek 'Underhive' version of the rules for the somewhat clunky original version.


http://wh40k.lexicanum.com/wiki/House_Delaque#.UGJGBLJmS6V

So anyway, I'll be running a Delaque gang through the brutal toxic sumps, and general grimy decrepitude and decay of the hopeless realms of the Necromundan Underhive.  The old GW figures haven't really stood the test of time, so I've trawled around the various suppliers for interesting looking figures to use.

My gang leader is going to be this fine filly from the 'pirates and spacefarers' range from Hasslefree.


http://www.hfminis.co.uk/shop?product=andreah~hfp022&category=miniatures~pirates-%26-space-farers
I have a few miniatures from Hasslefree and they are undoubtedly excellent sculpts of top quality.  However, they are 'true 28mm' figures, not the all too common 'Heroic' sculpts, which can cause some issues when mixing with other ranges.  However, how could I resist this lovely model?!

To that I've added the following as a 'juve' (or young ganger).


http://www.hfminis.co.uk/img_cms/product_images/HFP017brookeweb%20copy.jpg
This is a beautiful mini, brooding and full of character.  I'm planning to do a bit of conversion work on her, but to be honest I think she'll hit the table unspoiled.

I also got distracted and ordered this chap too...


http://www.hfminis.co.uk/img_cms/product_images/a037%20harby.jpg
I'm unsure what I'll use him for in the gang, but I liked his attitude.

To bulk out the main fighters, or 'gangers', I've gone for some of the excellent Pig Iron Kolony Rebel Infantry figures.


http://www.pig-iron-productions.com/bmz_cache/f/f57b2644602b25537e98c5f10e5c45d4.image.733x550.jpg
And to give a bit of variety and some special weapon options I also supplemented these with Kolony Feral Specialists.


http://www.pig-iron-productions.com/bmz_cache/3/3e64a422b974ff6f1b85717572c4fba2.image.733x550.jpg
To supplement the 'Juve' contingent of the gang, I've ordered a few of the East Riding Miniatures 'Slicks'.  


http://shop.eastridingminiatures.co.uk/ekmps/shops/ermp20/resources/Design/slicks.jpg

I think they're 25mm so slightly smaller, but that's fine as they're supposed to be kids...

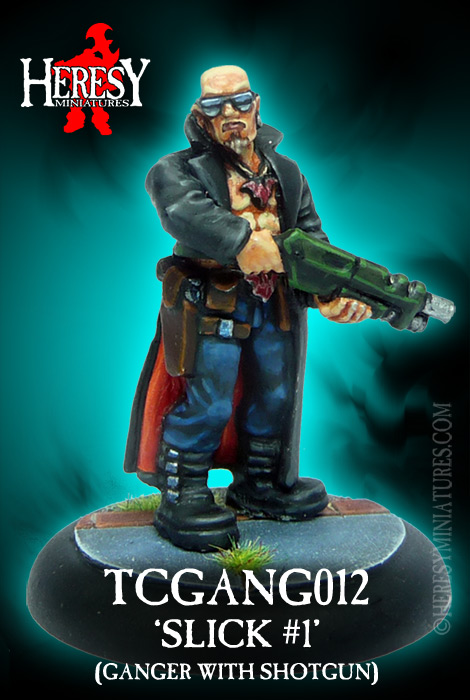
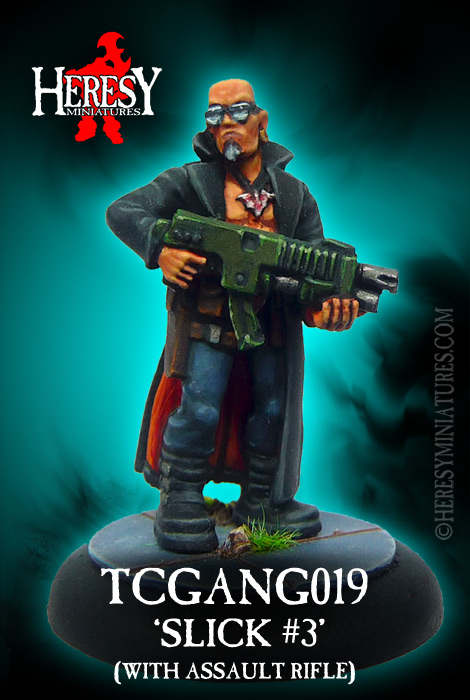
I've also supplemented them with a couple of the lovely Heresy 'sci-fi gang' figures.  


http://www.heresyminiatures.com/shop/images/large/tcgang012.jpg
http://www.heresyminiatures.com/shop/images/large/tcgang019.jpg
I'll probably do a bit of tweaking on these as they'll be my plasma gunners.

So, overall, i'm looking forwards to lavishing a bit of time and effort on these to try and tie them together as a cohesive gang.  I'll let you know how it goes...

Monday, 17 September 2012

Seven Years War with Maurice - Part three, the poor bloody infantry

I'll start this post with a slightly off-topic note.  I finally invested in a decent camera, so hopefully the images will be a bit better, clearer, sharper, etc.  I can't say the same for the quality of the miniature painting though. 

Oh, and one thing I noticed when I got home was the branding on the bag of the shop where I bought the new gizmo.  


I do rather hope this particular camera shop is simply unaware of the provenance of their logo!  Ahem...


http://www.firetown.com/wp-content/uploads/2011/04/nazi-eagle.gif


Anyway, onto the matter at hand, the Russian infantry for my Seven Years War army, or the first couple of units at least, using the 15mm Old Glory figures purchased from Timecast.    

The Russians of course issued their regiments with a standardised uniform which was red with a green winter coat.  I chose to go with the winter option for obvious reasons (doesn't it always snow in Russia?) but also because the red and green strikes a nice colour contrast to make the figures interesting.


The first two units, one in the front line, the other in mass behind.
Both units were painted using the techniques I described for the artillery earlier in this series, and I managed to get through both units in about four hours, not including the insane amount of preparation and flash cleaning, or the basing or drying time.  Given the detail and the relatively complex uniforms they did take a bit of time to complete.   


I'm really happy with they way they've turned out.  

My fellow gamers and I discussed at length the basing configuration we were going to use for these Old Glory 15mm figures, and settled on 30x30mm bases, with six infantry per base.  

We'd talked about 25x25mm, or 1"x1" basing but they didn't fit the mounted troops properly.  

We also discussed four infantry per base mainly due to cost, but to be honest I think our final decision was the right one.  They do look far better ranked up in 6's.


Given the period and the intricate standards used I've gone with pre-printed flags.  There's no way I could paint one of them freehand.  

The trouble is I can't remember the supplier I bought them from so when I run out I'll be in trouble.  D'oh!  They do look jolly nice though.


As you can see I've placed the banners at the centre front, straddled across two bases.  These are flanked by 'leaders' or officers, and then the drummers are on the outer edge of the 'command'.  Not sure if that's historically accurate but it looks good enough for me.   


All told, the army's progressing well.


I'm still awaiting the completion of the order from Timecast.  I emailed them today and should be getting the remaining figures sometime next week once they get through customs.

There's no hurry though as we're aiming for early 2013 to complete the project.  

Given my other armies on the go, I'm rather enjoying painting something that requires historical referencing.

Monday, 3 September 2012

Seven Years War with Maurice - Part two, laying in the guns.

Keen to get started on my Seven Years War Old Glory Russians, I chose to start with the figures I dread the most, the artillery.  Why dread?  Well, they come in lots of fiddly little pieces, all of which are flash-heavy, require a lot of cleaning and a lot of putting together.  I understand the need for multi-part casting from the practicalities of the moulding process, but I still hate having to glue these fiddly bits and bobs together.


The Old Glory artillery pieces were particularly heavy with flash that needed cleaning off, but once done, unlike many such models they fit together very well and before too long I had the guns and crew prepared, glued to their painting sticks  and undercoated. (and the cannons on the Pendraken bases).


Now then, there's a well established debate among wargamers concerning the undercoating of figures.  This traditional debate centres around the colour choice of the undercoat; white or black.  Personally I've never got on with white undercoats and every time I've tried to use it I've disliked the resulting finish.  So for me its usually the black undercoat.  However, of late I've taken to using a brown undercoat with a matt spray available from a well known car supply company.  i find the brown gives a more satisfyingly natural undertone to the colours, and whereas black, if used as recess low-lighting, gives a harsh relief, the brown looks more appropriate.   

Onto the painting itself.  Firstly some context.  I'm not painting figures to win awards here.  These are gaming pieces that are going to see a lot of hard use on the tabletop.  They need to look good at arm's length, not up close so I don't put too much effort into neatness of individual figures.  'Good enough' is my usual aim.  I actually have a bit of a reputation for being able to churn out figures at a fast pace, and this is probably why.  Over the years I've developed a simple technique to achieve decent playable results for my armies.  So as we go, you'll see what looks up close to be pretty rough painting.  It is, intentionally so.  Don't panic!

OK, so I start with the flesh.  The colour is roughly slapped on, in a fairly thick 'wash' (3:1 paint:water).


Pretty scruffy eh?  I always did go over the lines on my colouring books as a kid, mostly deliberately.  Carrying on, I roughly layer on the remaining colours; firstly the red coat, then the lighter details and finally the black areas to produce this dodgy looking fellow.

  
That's pretty terrible eh?  In 28mm I'd be looking to repaint at this stage.  But this is 15mm and at arm's length this chap looks pretty good!  OK, so onto the next stage, and its the part where the magic happens - the tone wash.  I use a dark brown ink wash, diluted to various degrees depending on the model.  In this case, it was roughly 50:50 ink-wash:water.  Slap it on liberally all over and it produces this.


This tone wash does a couple of remarkable things.  Firstly, it covers over all those rough, badly painted edges between the various different colours.  It provides 'deep' colour, filling the creases, deep recesses and other areas, making the figure 'pop out'.  Applying it over all the colours also covers the whole model in a 'tone' that gives a cohesive appearance. 

So i'm nearly done and the next stage after the tone wash is to sort out the detail.  this is the first stage that I'll switch to a detail brush and try and take a bit of care over where the paint goes.  Again, I'm going for speed here as much as precision, so its a matter of 'good enough at arm's length.  Layering the base colours on again, careful to highlight the 'high' areas of the model (nose, cheeks, shoulders, elbows, and any other prominent bits that poke out and are highly visible) fairly neatly should bring the little fellow into line nicely and end up looking something like this.


OK, the picture's a bit blurry but you should get the idea.  This chap is now ready to fall in on his base alongside his compatriots like this fine fellow.


Using this technique and with the figures arrayed on a painting stick, I was able to get through the 24 crew and guns in about an hour of painting (not including paint drying time, which added about half an hour).  

The cannons themselves were prepared in a similar manner.

A base colour is liberally washed onto the guns
The detail colours are added in 


A dark brown ink-wash tone is splashed all over the model


Finally the base colours are reapplied fairly carefully.  I wanted the cannons to be bronze looking and so added in several extra washes of brown ink and sepia ink over the barrel, and then drybrushed it with a 'gunmetal' colour.

All that remained was to assemble and base the models to bring it all together.


'And he levelled up his cannons, 
his victory to gain...'


Now then, for years I've struggled to find a decent way of basing my figures.  And after much trial, error, and bases i've been dissatisfied with I've settled on what you see here.  


It's a four-part process, although as I like speed and I'm basically impatient to get things finished I do it all in once sequence.

  1. A liberal spread of PVA glue.  I've found it best to leave a 2-3mm (1/8th") gap around the edge rather than splashing the PVA right up to the edge.  Also, try not to get any glue on the actual figures.  Easier said than done I find and most of my chaps lose their feet in the mud.  Hehe...
  2. Apply a rough sand mix.  I've mixed my own pot of basin material that combines dried sandy earth (I picked mine up on a country walk) mixed with sand.  Dunking the base in the tub works pretty well.
  3. Apply a fine grain mix.  Again i've made my own from various railway model sand.
  4. Dab on some spots of PVA glue.
  5. Apply a mid green flock.
  6. Dab on some more spots of PVA glue.
  7. Apply some static grass.


It produces the effect you see and is something I've settled on as 'adequate'.  

So there you go.  The artillery is done.  Next up, some infantry I think.

Saturday, 1 September 2012

Seven Years War with Maurice - Part one, the best laid plans...

One period we've talked about gaming for a few years has been the Seven Years War.  With the usual wargamer's procrastination that's all it's been; a lot of gum-flapping and good intentions.  Well, no more!  A few weeks back we came across a rather jolly little rule set, new to the market from inspired mind of Sam Mustafa, 'Maurice'.

One 'test game' using some American War of Independence figures we've got knocking about and we're hooked.  'Seven Years War' someone said.  'Hmm'...someone else said.

So I headed home, raided the piggy bank and Bob's your aunty's live in lover.  So, with the vagueness of our hobby, everything came in from the various suppliers.


I picked up the Maurice rules and cards from and evilbay seller and having had time to ruminate over them I must say they are very nice indeed.  The cards in particular just reek of quality.

After much discussion, we've decided to go with 30x30mm basing and so I gave Pendraken's Minibits a shout and bought in the required basing.  Incidentally, does anyone else think the laser-cut mdf smells like kippers?

The flags are from...um...?  Not sure actually.  I picked them up at Border Reivers and kind of lost track in the hubbub and the heat.  I also found a army and uniform guidebook on Caliver's stall at the show.  I now its all on the interweb, but there is something nice about having it in a book.  And you can never have too many sources eh?

So, oh yes!  Of course, the figures.  For various reasons we chose to return to 15mm and a collective decision was made to use the Old Glory Seven Years war range.  I bought these American imports through Timecast.  Delivery took about a week and unfortunately the order was incomplete.  I'm still waiting for two pacakges to arrive and the chaps at Timecast assure me it'll be about three weeks, if there aren't any problems at customs.  The other chaps have also not received their full armies so this seems to be par for the course with Timecast.

So, everything's set to embark on this new project.  For some reason I seem to have an affinity for the Russians and seem to end up with their armies in many periods.  No sense in bucking that trend here, and with the Austrians and Prussians already spoken for my choice was easy.

I'll kick off then with the unbagging ceremony (as distinct from a debagging ceremony, thankfully) and run through a little review of the figures.  I've never bought any Old Glory miniatures before so this'll be interesting.

Timecast's website says that a pack contains ' approximately 50 infantry,  16 cavalry, or 6 guns with 24 crew'.  'Approximately' is a bit worrying, but here we go.

First pack is 'SYR1 Russian musketeers'.


OK, so this first pack contains only 44 figures.  This is a bit of a problem since I need 48 figures to get the two units I need out of the pack.  I've contacted Timecast to ask for figures to make good the losses, so fingers crossed.  [Edit: Timecast responded to my email with the following: Sorry to hear of the short-fall in the bags, I will certainly get the figures for you and send them with the bags currently on back order, so excellent news!].  Each pack appears to contain four rather flamboyant leaders, four drummers, four flag bearers, four chaps pointing (presumably an NCO?) and then a variable number of line infantry.

The figures themselves are, shall we say, rather generous for 15mm.  A quick measure shows them to be on average 15mm from foot to eye line.  to the top of the head they vary between 18mm and 20mm, so these are big chaps!

Also, I suspect the Old Glory moulds are getting on a bit as there's a LOT of flash on almost every model.  Note particularly the flash from each figure's coat tails to heel.


As I hate cleaning figures, this is going to annoy me immensely.

But they are very nice figures, well sculpted and detailed.  Here are the drummers and one of the flamboyant leaders I mentioned.


And here they are, laid out in the arrangement for my Maurice basing.  Four short...


OK, so moving on, the other units are:

Grenadiers


Hussars


Cuirassiers.


Assorted generals, commanders, and other mounted personalities.


And finally, some artillery.  there appears to be two larger pieces, four medium guns and a small howitzer style cannon.  Thankfully all the bits are there, and although all 24 crew are present, its surprising that they don't appear to be distributed as six consistent crew configurations.


So I'll clean these up and start painting fairly shortly, and let you know how it goes.